CenterPoint Accounting
- Scanning and Attaching Documents
Related Help
_24.jpg) File Attachments Video - Duration: 7 min 45 sec
File Attachments Video - Duration: 7 min 45 sec

This document describes the setup and processes used to scan and attach files to transactions and setup screens. Files can be attached to the following setup screens: Customers, Vendors, Names, and Employees or the following Transaction screens: Purchase Orders, Payments, Vendor Invoices(A/P), Sales Orders, Receipts, Customer Invoices (both basic and detail), and General Journal Entries. Files can be attached by scanning the documents, dragging and dropping existing files from your computer, or by selecting an existing file from your computer.
Prerequisite
A scanner must have TWAIN compatibility to be used with CenterPoint. A scanner that does not have TWAIN compatibility can be used to scan a document and save it to your computer and then attached by following the Attach Documents to Transactions or Setup Screens section in this document.
If you use the Red Wing Software Cloud Service, scanners that are setup on a local computer can be accessed by the cloud service for direct scanning into CenterPoint. Contact the Red Wing Software Sales department to set up your Red Wing Software Cloud environment to accept scans and see the Frequently Asked Questions section of this document for additional information.
Step C: Finding Transactions with Attachments
Step D: Viewing Attachments on Setup Screens
Step A: Set File Attachments Preference (One-Time Setup)
CenterPoint gives you the option of storing your attachments in a file repository or to your database. Red Wing Software recommends using the File Repository, but there are benefits and downsides to both options. Choose the option that will work best for your organization.
- File Repository – Attachments stored in the file repository are saved in a specified location on your local computer or network. Files are encrypted so they can only be viewed from within CenterPoint. The benefit of a file repository is that the attachments will not increase your database size. If you are using SQL Server Express your database is limited to 10 GB. Potential negatives are ensuring the location chosen has proper permissions set so all users have the access they need. Also, if the files are moved for any reason, you will need to update CenterPoint with the new location, or CenterPoint will not be able to find the files. File attachments can be backed up from File > Backup > Backup File Repository. For additional information, please see the Backup or Restore File Repository topic.
- Database – Attachments stored in the database are saved with the rest of your CenterPoint data. The benefit is that the files cannot be lost and will always be accessible within CenterPoint. The potential negative is that a large number of attachments could quickly enlarge your database size past the 10 GB maximum for SQL Server Express. If you use a full version of SQL Server, there is no maximum database size.
- Select File > Preferences > General > File Attachments.
Display File Size Warning Message
Scanning and attaching files to a transaction or a setup screen will increase your database size if you choose to store the files to the database. If you are using SQL Server Express your maximum database size is 10GB and if you are using the full version of SQL Server your database does not have a maximum size. It is suggested to scan your documents in black and white instead of color to decrease each scan's total size. You can choose to display a warning message that reminds you when scanned or attached files exceed 2MB with this preference.
- In the Display File Size Warning Message box, select Yes or Not Set if you want to be warned when an attached file exceeds 2MB, or select No if you never want to be warned about attached files that exceed 2MB. Note: If you receive the warning message when attaching a file and decide that you do not want to display the warning message again, select the Don't show this message again check box and the Display File Size Warning Message preference will automatically be changed to No.
Store Attachment Files In
- In the Store File Attachments In box:
- Leave the default value of Prompt Me if you want CenterPoint to ask you each time you attach a document where you want to store the attachment with the following message. If you choose the Always perform with this action check box and then click the action, the preference will be set with that action.
![]()
- Select File Repository (Recommended) to automatically store an encrypted version of your attachment in a location on your computer or server you specify in the Location of File Repository preference in step 4.
- Select Database to store your attachment in your CenterPoint database.
Location of File Repository
-
In the Location of File Repository box, select a a server drive (UNC path), for example: \\SERVER\Share\.
- If you currently have attachments that are stored in your CenterPoint database and you want to move the files to your File Repository location specified in step 4, click Transfer Database Attachments and at the This will move any attachments stored in the database into the file repository location specified. Do you want to continue message, click Yes.
- Click Save.
Note: If you transfer database attachments, to reclaim the space previously allocated to the attachment files stored in the database which are now stored in the file repository:
- Perform a database backup from File > Backup Database.
- Select File > Administration > Database Utilities > Shrink Database. A screen will display with statistics about your allocated disk space and available free space.
- To reclaim the unused disk space, click Shrink.
- At the Shrink the database to reclaim unused disk space, are you sure? message, click Yes.
- Click OK. The statistics about your disk space will be updated accordingly.
Step B: Attach Documents to Transactions or Setup Screens
Documents can be attached on the to the following setup screens: Customers, Vendors, Names, and Employees or the following Transaction screens: Purchase Orders, Payments, Vendor Invoices(A/P), Sales Orders, Receipts, Customer Invoices (both basic and detail), and General Journal Entries. This document will use the Payments screen for the examples. Files can be attached by scanning the documents, dragging and dropping existing files from your computer, or by selecting an existing file from your computer.
Attach Documents with One-Click Scanning
One-Time Scanner Setup
Scanner setup is only required for the one-click scan and attach option. You can attach via drag and drop or select existing documents from your computer without having a scanner set up.
- Connect a scanner to your computer and verify it is operational.
- Select File > Scanners.
- Click New.
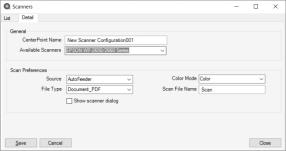
- In the CenterPoint Name box, enter a required name (up to 50 characters).
- The Available Scanners box will display all the scanners available to your computer. Select the scanner you want to configure. If your scanner is connected to your computer and is operational, but does not appear in this list, please refer to the Prerequisite statement at the top of this document.
- The Source box will default to AutoFeeder, if your scanner is a flat bed scanner, select Flatbed.
- The File Type box will default to Document_PDF (scanned documents will be saved as PDF files), if you want the scanned documents to be saved as an image file instead, select Image_PNG.
- All image file types create one file per document.
When the Source = Flatbed, a single file is created for each document page.
When the Source = Feeder and the File Type = Document_PDF, one file is created from multiple page documents.
- The Color Mode box will default to Black & White (scanned documents will be saved in a smaller file size in black and white), if you want the scanned document to be saved in a large file size in color instead, select Color.
- In the Scan File Name, enter a default file name for your scanned documents. The file name will originally display as Scan. CenterPoint automatically appends a unique identifier to the default name when your document is attached to the transaction. For example, ScanC793.pdf or ScanE072.png.
- The scanner will use the default settings from File > Scanners in CenterPoint unless you select the Show scanner dialog check box to display your scanner's settings screen for each scan to change the scanner's setup. Changes made in this screen will not be saved in File > Scanners.
- Click Save.
- Click Close.
One-Click Scanning
- Follow the One-Time Scanner Setup section in this document.
- From a setup screen or a transaction screen, enter your applicable information.
- Insert the document(s) to be scanned into your scanner.
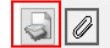
- Click the Scanner button.
- If you chose to display your scanner's setup screen, it will display and allow you to make changes to this scanned document. Most likely, you will need to initiate the scan from the scanner setup screen. The scanned document will be attached automatically.
- If you did not chose to display your scanner's setup screen, the scanned document will be attached automatically.
- After you attach a document, the Paperclip button will display with a yellow background.
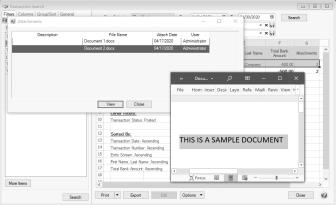
- To view an attached document, click the yellow Paperclip button, select the document, and then click View.
- To delete an attached document, click the yellow Paperclip button, select the document, and then click Delete.
- To view an attached document with a specific tag(s), click the yellow Paperclip button, in the Tags box, enter the tag(s) name and then tab off of the box or press Enter.
- For customer invoice or sales order transactions, select the Email check box to indicate that when the invoice or sales order is emailed that the attachment will also be emailed.
- Continue with the After Documents are Scanned or Attached section in this document..
Attach Existing Documents
- From a setup screen or a transaction screen, enter your applicable information.
- Click the Paperclip button.

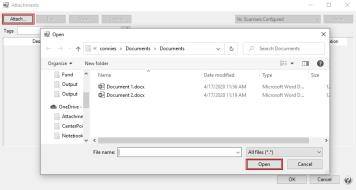
- The Attachments screens displays. Either drag and drop files from your computer on to the Attachments screen or click the Attach button to select the files.
- After you attach a document, the Paperclip button will display with a yellow background.
- To view an attached document, click the yellow Paperclip button, select the document, and then click View.
- To delete an attached document, click the yellow Paperclip button, select the document, and then click Delete.
- To view an attached document with a specific tag(s), click the yellow Paperclip button, in the Tags box, enter the tag(s) name and then tab off of the box or press Enter.
- For customer invoice or sales order transactions, select the Email check box to indicate that when the inovice or sales order is emailed that the attachment will also be emailed.
- Continue with the After Documents are Scanned or Attached section in this document.
After Documents are Scanned or Attached
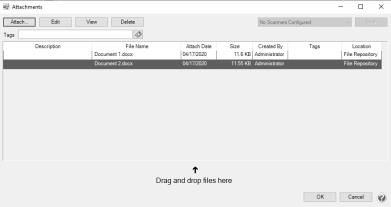
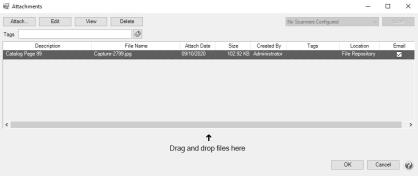
After you scan, drag and drop, or attach a file, the Attachments screen automatically displays as follows:.
- From Customers, Vendors, Names, and Employees or the following Transaction screens: Purchase Orders, Payments, Vendor Invoices(A/P), Receipts, and General Journal Entries.
OR
From the following Transaction screens: Sales Orders, Sales Order - Quick Entry, Customer Invoices (both basic and detail), and Customer Invoices - Quick Entry:
- For customer invoices and sales orders only, to indicate that the attachment should be emailed when a customer invoice or sales order is emailed, select the Email check box.
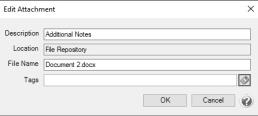
- To add an optional description for an attachment, select a document and then click Edit. Click OK.
- Tags can be added to attachments to organize them by keyword and make it easier to find specific sorts of attachments later. For example, you might create a tag called W4 for employee attachments or a tag called SalesTaxExempt for Customers. Tags are limited to a single word with no spaces. You can add multiple tags to the same attachment. There are two methods to add tags to an attachment.
![]()
- Method 1: Enter Tags separated by commas.
- On the attachments screen, select a document and click Edit. In the Tags box, enter tags separated by a comma, then click or tab off the Tags box.
- Tags that have been used before will be added to this attachment.
- If you enter a tag that has not been entered before you will be prompted, “The following Tag(s) were not found. Would you like to add them now?” Click Yes to add the tags and assign them to this attachment. Click No to skip adding the new tag.
- Method 2: Select from a list of tags
- On the Attachments screen, select a document and click Edit. Click the Tags icon
to open the Tags selection window. Use the arrow buttons to move the tag(s) for this attachment from the Available Tags list to the Selected Tags list on the right. If you would like to use a tag that is not on the list, click New to create a new tag.
Note: To see a list of all tags, go to Setup > File Attachments > File Attachment Tags. From this maintenance screen you can:
- Create new tags.
- Edit existing tags.
- Delete tags you no longer use (deleting a tag will remove it from any attachment where it was assigned).
- Combine tags, if for example, the same tag is entered with different spelling.
Step C: Finding Transactions with Attachments
Transaction Search
- Select Processes > Transaction Search or Reporting Tools > Transaction Search.
- In the Date Selection or date From/To fields, specify the appropriate date range to search. By default, the Date Selection criteria is set to This Month. To set your selection to display each time you start Transaction Search, right-click and select Set As Default.
- Select any of the other Search criteria to specify how you want the Search results to display.
- Select the Columns tab:
- Leave the Level field set as Transaction Summary.
- Place a check mark in the Attachments check box and any other columns you want to include in the search results and then determine the order the columns should display in. Use the arrow up and down buttons to order the columns.
- Click Search.
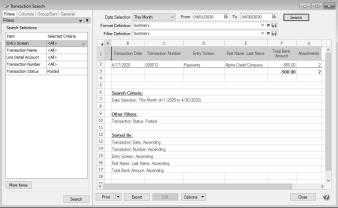
- An Attachments column will display and if a transaction has attached documents, the number of attachments displays in the Attachments column.
- To view the documents attached to the transaction, right-click on the transaction and select View Attachments. Select the document you want to view, and then click View.
- Click Close.
- If you'd like to save these selected columns as a format that can be used again (without having to manually select and reorder), click on the save
 icon next to the Format Definition field. The save process will prompt you to name this new Format Definition for future use.
Purchase Order Maintenance
- Select Processes > Purchases > Purchase Order Maintenance.
- Right-click and select Add/Remove Columns.
- Select Attachments and click OK. An Attachments column will be added to the Purchase Order List tab.
- A new Attachments column will display and if a transaction has attached documents, the number of attachments displays in the Attachments column.
- Select the document you want to View, Edit or Delete. Additional documents can be attached to the purchase order by clicking Attach.
- Click OK and then click Close to return to the Purchase Order Maintenance List tab.
Sales Orders
- Select Processes > Sales > Sales Orders (Edit/Fill/Invoice).
- Right-click and select Add/Remove Columns.
- Select Attachments and click OK. An Attachments column will be added to the Sales (Edit/Fill/Invoice) List tab.
- A new Attachments column will display and if a transaction has attached documents, the number of attachments displays in the Attachments column.
- Select the document you want to View, Edit or Delete. Additional documents can be attached to the purchase order by clicking Attach.
- Click OK and then click Close to return to the Sales (Edit/Fill/Invoice) List tab.
Step D: Viewing Attachments on Setup Items
Setup Screens
- Select the appropriate setup screen, for example Setup > Employees, Setup > Customers, etc.
- Select a record and then click Edit. Click the green arrows to move through your records.
- Records with a yellow Paperclip button indicate that the record has an attachment.
- To view an attached document, click the yellow Paperclip button, select the document, and then click View.
- To delete an attached document, click the yellow Paperclip button, select the document, and then click Delete.
- To view an attached document with a specific tag(s), click the yellow Paperclip button, in the Tags box, enter the tag(s) name and then tab off of the box or press Enter.
Step E: Maintaining Attachments
With the ability to attach files in CenterPoint, there may be a need to view or delete the documents separately from the transaction or setup screen. The File Attachments Maintenance screen is used to display attachments for specific screens, date range, tags, and user. The attachment can then be viewed or deleted.
Note: The File Attachment Maintenance screen has a security policy that can set to allow access to the screen.
- Select Setup > File Attachments Maintenance.
- Select a specific Screen to display attachments for or All to display all attachments for all screens.
- In the From/To boxes, enter a date range to display attachments for.
- In the Created By box, select a specific user to display attachments for, or leave blank to search for all users.
- To filter for attachments with a specific tag(s), in the Tags box, enter or select a tag(s) to display attachments for, or leave blank to search for all tags.
- Click Search.
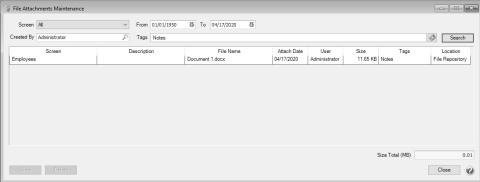
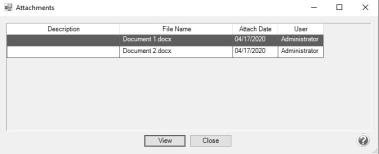
- Select the attachment you want to view or delete. Click View or Delete.
- Click Close.
Frequently Asked Questions
Q. How do I set up scanning in my Cloud environment?
A: Contact the Red Wing Software Sales department to set your environment to allow scanning. Once you are notified by Red Wing Software that your Cloud environment is set to allow scanning, continue with the instructions below.
-
Download and install a local TSScan client on any computer you will be scanning from by selecting the appropriate operating system link below. The files are small and complete installation without notification.
-
Follow Steps A - E of this document.
|
Document: 3290 |
|---|